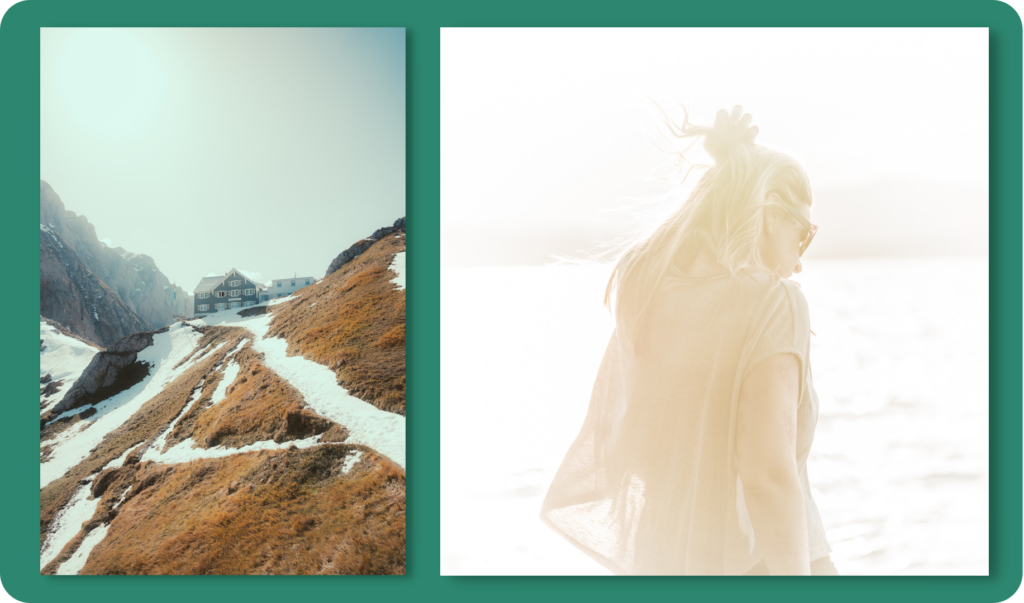
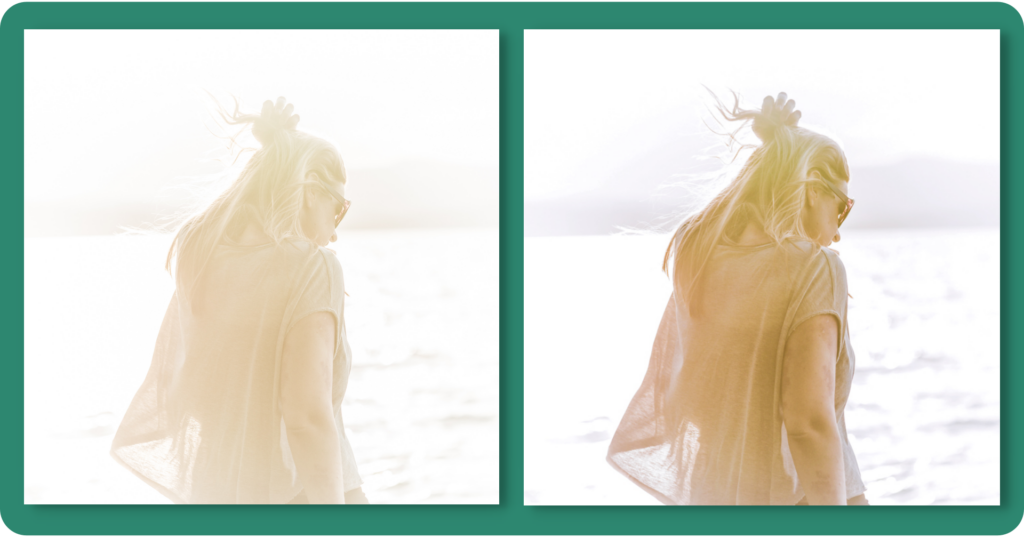
Overexposed photos are a nightmare – not because they’re difficult to fix, but because of the details lost in the white, overexposed areas that are nearly impossible to recover without some proper planning beforehand.
Today, I’m going to showcase how I fix these photos. Keep in mind that the best way to fix overexposed shots is to not have them in the first place – and in the latter half of this piece, I’ll give you some advice to save you a lot of work in the future.
But for now, you’re likely here because you’re sick of that exposure slider and want to read some actual theory and a tutorial – so let’s dig in:
How to Fix Overexposed Photos
There are 4 ways to deal with shots with too much exposure:
- Use the adjustment sliders.
- Use a radial gradient filter.
- Use the adjustment brush to fix specific areas of the overexposed image.
- Avoid shooting photos with natural light falling directly on your camera’s light sensor.
Next, I’ll break down the first three one by one. I used Lightroom for this tutorial, but you can use whatever editing software fits your workflow as long as you follow the basic steps.
Note: remember to calibrate the monitor you work on at least once a month. Use a color calibration tool such as TruHu to effortlessly achieve accurate color with just your phone camera.
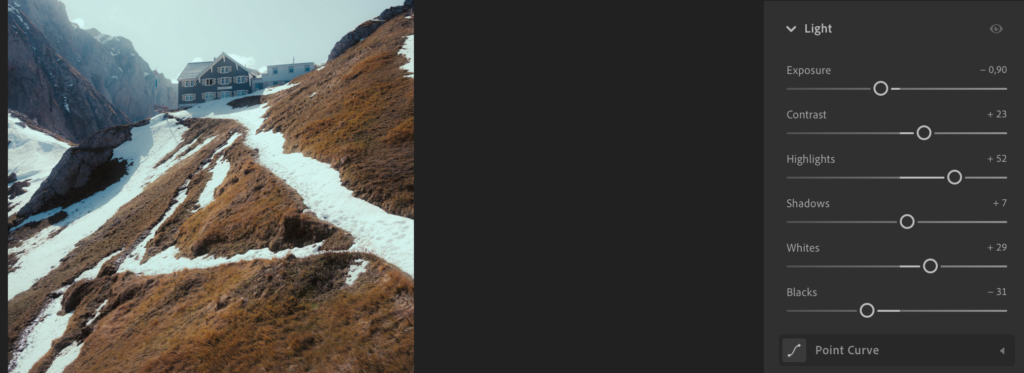
1. Use the Adjustment Sliders for the Entire Shot
The simplest and most straighforward way to fix overexposed shots is to use the adjustment sliders. Here’s some advice on how:
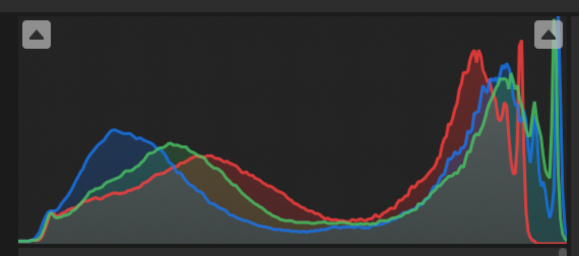
- Look at the Histogram. Reading the Histogram requires a guide of its own, but for now what you need to know is in bright photos, the red channel will be high on the right side, indicating that your highlights contain a lot of red colors – then the higher the line goes, the brighter the areas. If it clips through the top of the Histogram, that means there are overexposed areas in your image that are simply white, lacking any detail. To show these areas, click on the two arrows at the top of the Histogram or press J in Lightroom.
- Adjust Light, Color, and Effects sliders. Start by lowering the Exposure slider, making the image slightly darker. Then I recommend upping the Dehaze slider under Effects to enhance the details ever so slightly. Controlling Whites, Highlights, Shadows, and Blacks should also help you fix your image.
- Be conscious of your Histogram. For any adjustments, look at the red line in your Histogram and attempt to lower it.
- Aim for no clipping. Your goal should be to remove clipping so there are no red areas on your image when pressing J.
- Keep an eye on the image. If you’re new to photo editing workflows and just learned how to read a Histogram, you might make the mistake of looking at the graph and forget about photo itself. Remember, it’s best to strike a balance between the two so that the image actually looks how you want it to look while removing any clipping.
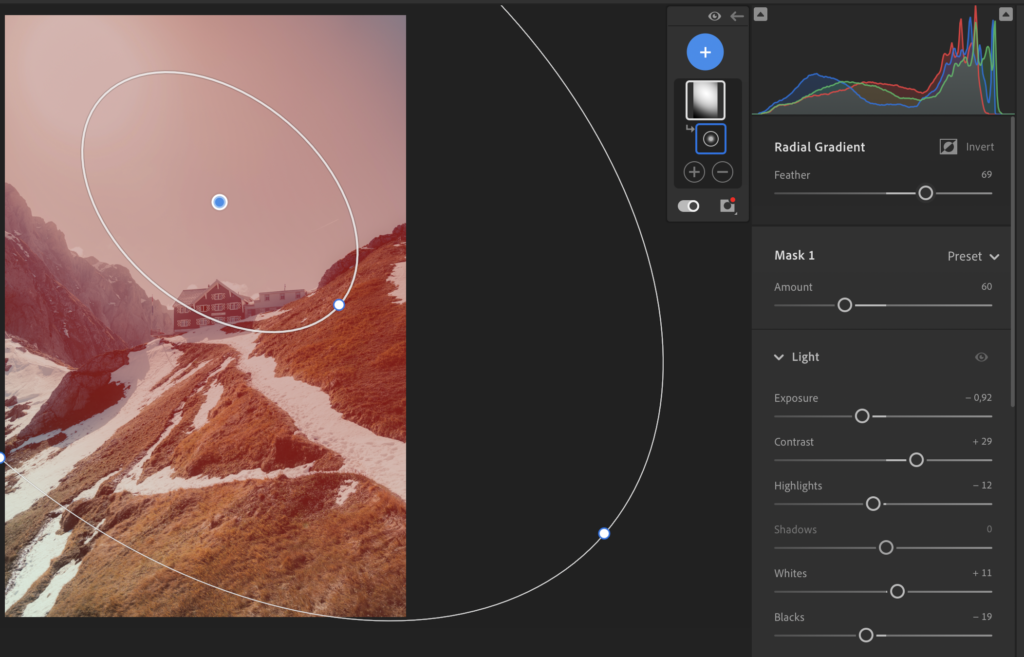
2. Add a Radial Gradient Filter to an Area or the Whole Shot
The next best way to reduce exposure in your images is by using a mask to add a filter. Here’s how to do it:
- Open up the Masking menu. In Lightroom, that means pressing M.
- Select the Radial Gradient option. Place the gradient mask over the image areas that are affected the most. We recommend placing it over the sun rays and extending it over the parts of the image that seem most affected.
- Adjust Light, Color, and Effects sliders. As with the previous method, begin editing the same sliders in your Gradient (lower Exposure, increase Dehaze, adjust Whites, Highlights, Blacks, Shadows, Color to fit).
- Be conscious of your Histogram. For any adjustments, look at the red line in your Histogram and attempt to lower it.
- Adjust the amount. If you’ve effectively fixed the overexposure but the image now looks artificial, try reducing the Amount slider to lower the impact of the mask on your photograph.
- Aim for no clipping. After applying the filter, press J and see if there are any red areas (clipping – overexposed white areas) on the image. If there are, go back to your mask or use method 1 to remove it.
3. Use the Adjustment Brush to Fix Overexposed Areas
Some images might be unsalvageable without sacrificing the background or other areas that are too bright. Conversely, maybe your other methods need a bit of manual work to get a satisfactory final result. In both cases, the Adjustment Brush comes to the rescue:
- Open the Masking menu. As with the previous method, this one also starts with a mask. Press M in Lightroom to open up the Masking menu.
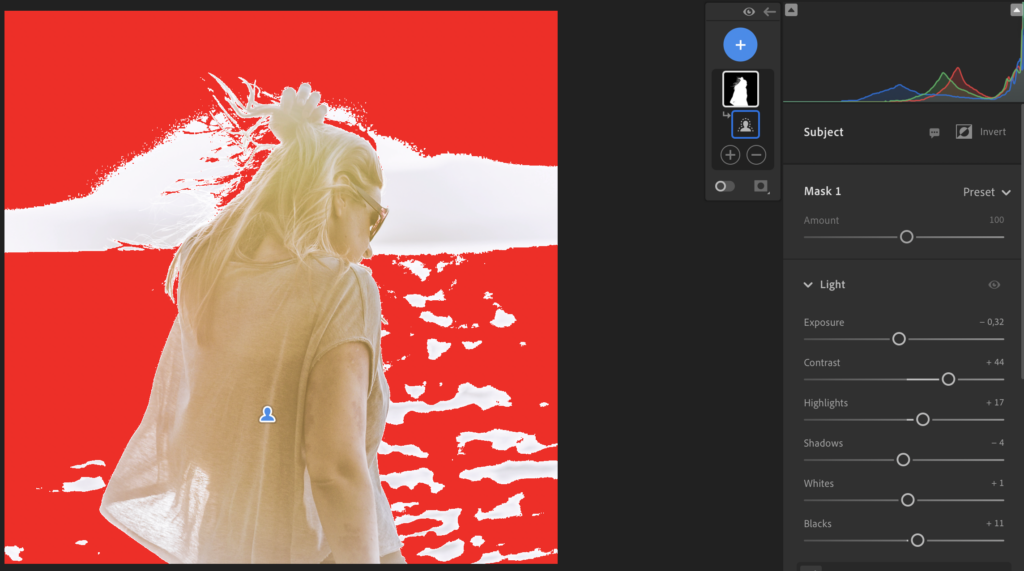
- Select the Brush. Carefully brush over the areas that need manual adjustments. As you’re working, show the overlay to ensure you’re not brushing over areas that seem fine. Press O in Lightroom to do this.
- (Optional) Auto-select the Subject / Background. New versions of Adobe Lightroom use AI to select the subject or background of the image, allowing you to easily apply adjustments directly to those if necessary.
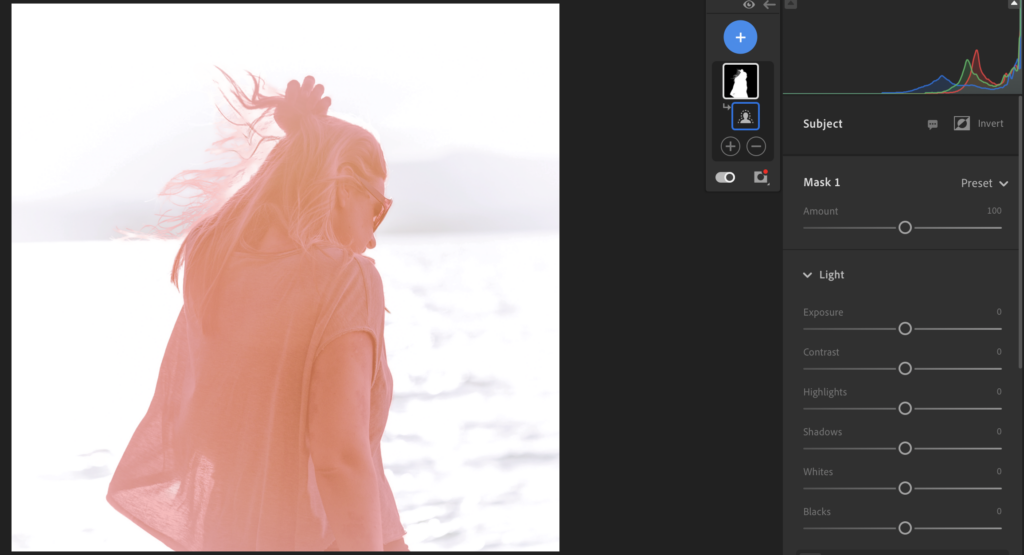
- Adjust Light, Color, and Effects sliders. As with the previous methods, edit the same sliders in your new Adjustment Brush mask (lower Exposure, increase Dehaze, adjust Whites, Highlights, Blacks, Shadows, Color to fit). As you go, make sure to compare the image to the original and press O occasionally to see if you need to remove some areas from the mask.
- Be conscious of your Histogram. For any adjustments, look at the red line in your Histogram and attempt to lower it.
- Adjust the amount. You can also adjust how much the Brush mask affects the image by lowering or increasing the Amount slider.
- Aim for no clipping. After applying the new Brush mask, press J and see if there are any red areas (clipping – overexposed white areas) on the image. If there are, go back to your mask or use methods 1 or 2 to remove any clipping.
Note: the most difficult images will require a combination of at least two of the methods above.
Why Overexposed Photos Happen and Tips to Prevent Them
Overexposure happens due to mostly two factors: the camera is not as sensitive as our eyes, or our eyes are simply too accustomed to overexposed screens that we lose the ability to perceive nuance when it comes to luminosity (another fantastic reason to calibrate your screen for accuracy).
From a technical standpoint, we also have to consider The Exposure Triangle. This small photography hack essentially indicates the relationship between your camera’s ISO, Shutter Speed, and Aperture. The more the first two increase, the brighter your image will get. Conversely, the photo will also be brighter the more you lower your Aperture.
- Understand how your camera captures light. Every camera has a sensor that doesn’t adapt as well to shifts in lighting as the human eye. That means when you’re shooting something in the shade on a bright, sunny day, your details might be lost, so look for positions in which you can see more details in the shaded areas of your shot.
- Shoot RAW photos. Every camera allows you to shoot in RAW mode, essentially giving you more freedom to edit the image once you’re done for the day. Each brand has its own RAW file format, but editing software nowadays supports most, if not all, of them.
- Choose a metering mode. Every camera comes with three light metering modes:
- Evaluative Metering (also known as Matrix Metering), is when the sensor considers the lighting in the entire scene for setting exposure.
- Center-weighted metering, when your camera focuses on the subject in the center of the scene to determine the appropriate exposure.
- Spot Metering, when your camera considers the lighting of a specific spot in your scene.
- Underexpose instead of overexposing. As a general rule of thumb, it’s better to underexpose an image instead of overexposing it, because doing so preserves more details.
- To be safe, use exposure bracketing. Bracketing is a photography technique through which you take multiple versions of a photo across a spectrum of settings to create backups in case your main image is unsalvagable. Exposure bracketing simply means taking three versions of your photo, one normal one and one with +1 / -1 exposure. For real estate photography, shoot the extra ones in +3 / -3 exposure and then superimpose them to create an HDR look that effectively illuminates dark areas while keeping bright areas visible,
- Calibrate your monitor. Even if you take all the care in the world to save your photos, it might not matter when the screen used for editing is unoptimized. That’s why we built TruHu, a color calibrator that helps any photographer – from beginner to pro – overcome the costly hurdle of getting a colorimeter and instead just using their phone.
Summing Up
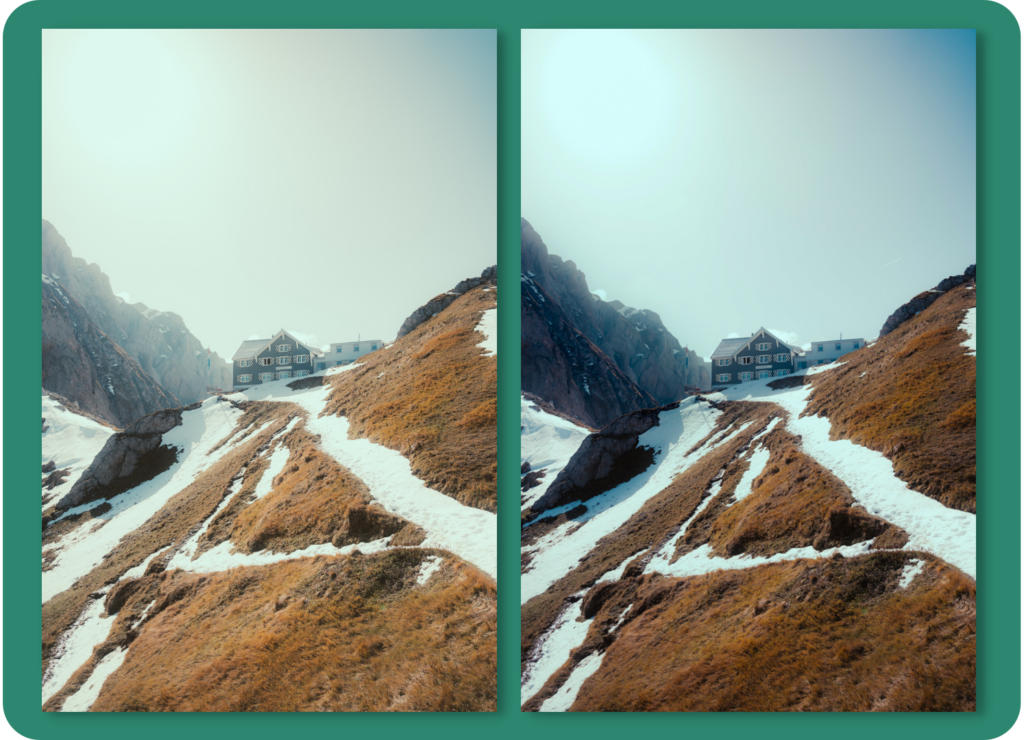
Overexposure can be successfully addressed if you follow the tips laid out here. That said, if you ever have exposure troubles with your photography, using the three methods above will fix them as best as possible.
For more photography tips and tricks, stay tuned to the TruHu Blog!