What Is a Blue Screen of Death on Windows 11/10?
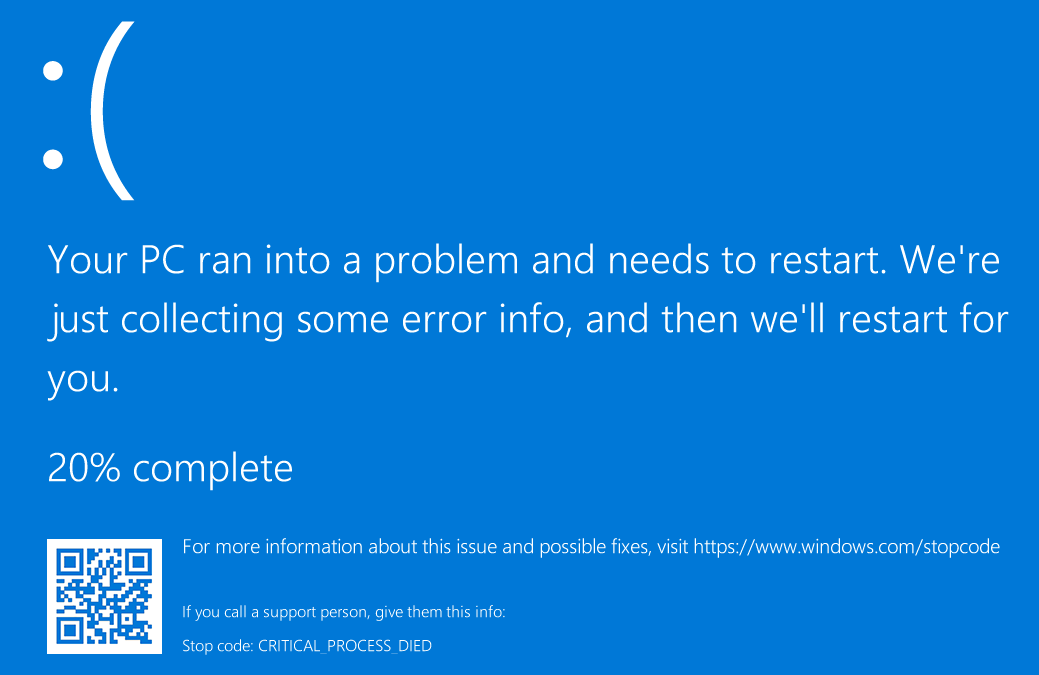
The Blue Screen of Death (BSoD) is known as a Stop error or Blue Screen error that usually happens on a Windows computer. When your Windows 11/10 computer has a fatal system error, your system will be interrupted and show a blue screen with an error code.
When you see a blue screen, it means that your system is crashed and can no longer operate safely. The causes of the Blue Screen of Death are various. Hardware failure or unexpected termination of a crucial process could be the main reason.
How to Force a Blue Screen of Death on Windows 11/10?
Of course, you’d better not encounter a Blue Screen of Death when using a computer. But at times, you may need to force a Blue Screen of Death on Windows 11/10 for a bug check. For example, when you want to test the system or a program you’re developing or play a prank on someone, you can want to manually trigger a Blue Screen of Death.
How to get a Blue Screen of Death screen on Windows 11/10?
Here are 3 ways:
- You can edit the Registry key to force a Blue Screen of Death on Windows 11/10.
- You can use Task Manager to force a Blue Screen of Death on Windows 11/10.
- You can run a special command in PowerShell to force a Blue Screen of Death on Windows 11/10.
How do I trigger a Blue Screen of Death on Windows using these 3 methods? This article will introduce these 3 methods.
What to Do before You Force a Blue Screen of Death on Windows 11/10?
Back up your data in advance
To protect your files and system, we think you’d better back up your computer. You can use MiniTool ShadowMaker, professional data backup software for Windows, to back up your computer to an external hard drive.
This Windows backup software is specially designed to back up files, folders, partitions, disks, and systems. You can also use it to sync files and folders. It supports schedule and event trigger backup, differential and incremental backup schemes.
MiniTool ShadowMaker trial edition allows you to use it for free within 30 days. You can click the following download button to directly get it on your device.
MiniTool ShadowMaker TrialClick to Download100%Clean & Safe
It is very easy to use this backup tool to back up your files and system.
After downloading and installing this software on your device, you can use these steps to make a backup:
Step 1: Open MiniTool ShadowMaker and you will see its Home page.
Step 2: Switch to the Backup panel.
Step 3: Select the source files/folders/partitions/disk and the destination drive to save the backup.
Step 4: Click the Back Up Now button to start the backup process.

It will take a while to finish the whole backup process. You need to wait until the whole process ends. You can click Manage from the left menu to view the backup process.
In addition, you can click the Options button to set up the backup according to your requirements.
Close the running programs and save your documents
To get out of the Blue Screen of Death screen that is created by yourself, you need to restart your computer. So, before you use the following methods to force a Blue Screen of Death, you need to close the running programs and save your documents.
Now, we will continue introducing how to force a blue screen on Windows 11/10 using the 3 methods mentioned above.
Way 1: Use the Registry Editor to Force a Blue Screen of Death
Here is a reminder:
Editing the registry key is risky. If you make a mistake, there may be irreversible damage to your system. To protect your computer, you should back up your registry key in advance.
When everything is prepared, you can follow this guide to get a blue screen via Registry Editor:
Step 1: Press Windows + R to open the Run dialog.
Step 2: Type regedit in the Run dialog and press Enter to open the Registry Editor.
Step 3: If you are using a USB keyboard, you need to go to this path:
HKEY_LOCAL_MACHINE\SYSTEM\CurrentControlSet\Services\kbdhid\Parameters

Step 4: Right-click the Parameters key and go to New > DWORD (32-bit) Value.
Step 5: Name the new DWORD key CrashOnCtrlScroll.
Step 5: Double-click the newly created DWORD key to access it. Then, change its value from 0 to 1.
Step 6: Click the OK button to save the change.
Step 7: (Optional) If you are using a legacy PS/2 keyboard, you need to go to this path:
HKEY_LOCAL_MACHINE\SYSTEM\CurrentControlSet\Services\i8042prt\Parameters
You can directly copy and paste the path to the address bar in the Registry Editor.
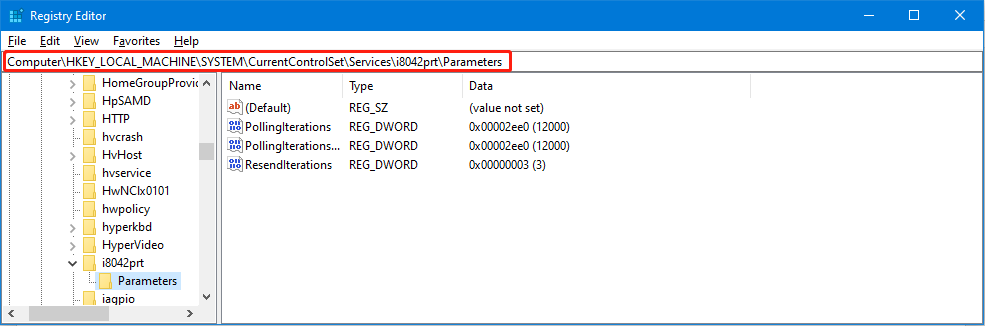
Step 8: Right-click on the right side of the interface, then go to New > DWORD (32-bit) Value.
Step 9: Name the new DWORD CrashOnCtrlScroll.
Step 10: Double-click the newly created DWORD and change its value from 0 to 1.
Step 11: Click the OK button to save the change.
Step 12: (Optional) If you are using the Hyper-V keyboard on a virtual machine, you can go to the following path:
HKEY_LOCAL_MACHINE\System\CurrentControlSet\Services\hyperkbd\Parameter
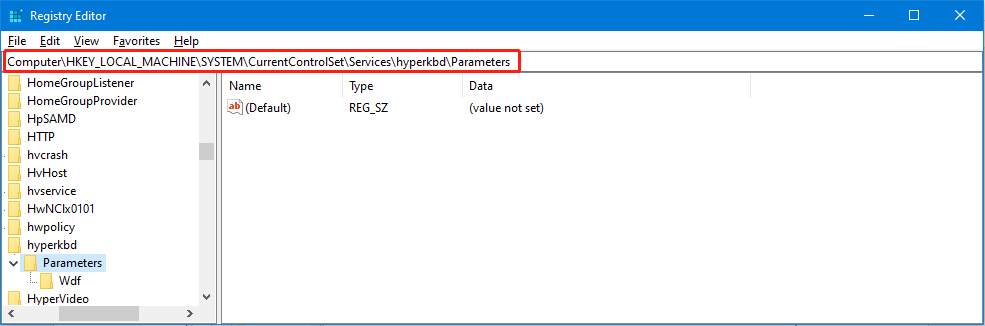
This key is only available on devices with Hyper-V already enabled.
Step 13: Right-click on the right side, then go to New > DWORD (32-bit) Value.
Step 14: Name the new DWORD CrashOnCtrlScrol.
Step 15: Double-click the newly created DWORD and change its value from 0 to 1.
Step 16: Click the OK button to save the change.
Step 17: Close Registry Editor and restart your computer.
Step 18: Press and hold the right Ctrl key and then press the Scroll Lock key twice to trigger a Blue Screen of Death.
After these steps, the system will trigger a KeBugCheck and then show a 0xE2 error displaying a bugcheck with a MANUALLY_INITIATED_CRASH message. Your Windows 11/10 computer will also generate a dump file for further debugging.
If you want to undo the changes, you can restart your computer and delete the CrashOnCtrlScroll DWORD keys in the above three paths.
Way 2: Use Task Manager to Get a Blue Screen of Death
You can also make some operations in Task Manager to trigger a Blue Screen of Death. Here are the steps:
Step 1: Right-click the taskbar and select Task Manager.
Step 2: Click More details if you only see a few options.
Step 3: Switch to the Details tab.
Step 4: Scroll down and find wininit.exe, then select it and click the End task button to close this service.
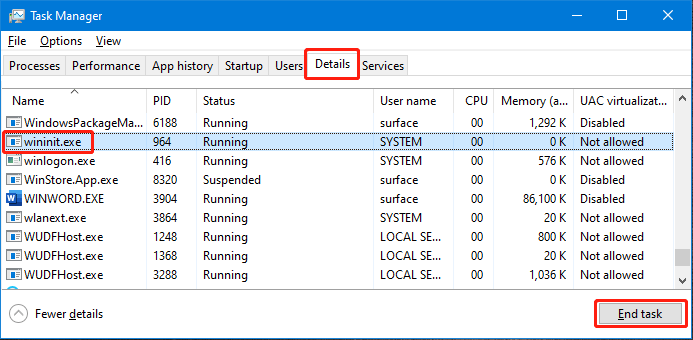
Step 5: Wait and you will see a dialog box. Then, select the Abandon unsaved data and shut down option and click Shut Down.
After these steps, you will see the blue screen. To get rid of the blue screen, you can just restart your computer.
Way 3: Use Windows PowerShell to Trigger a Blue Screen of Death
To use Windows PowerShell to trigger a Blue Screen of Death, you can use these steps:
Step 1: Click the search icon in the taskbar and search for PowerShell.
Step 2: Right-click Windows PowerShell from the search results and select Run as administrator.
Step 3: Type wininit into PowerShell and press Enter to run this command.
Then, the blue screen will appear with some error messages.
How to Rescue Your Files on Windows 11/10 Using MiniTool Software?
If you encounter a true Blue Screen of Death error, you can use the methods mentioned in the following two articles to fix Blue Screen of Death on Windows 11/10:
- How to Recover Data after BSOD & How to Fix Blue Screen of Death
- What Is Windows 11 Blue Screen? How To Fix BSOD Error On Your PC
If some of your important files get lost or deleted by mistake, you can use the professional data recovery software, MiniTool Power Data Recovery, to get them back.
MiniTool Power Data Recovery is a free file recovery tool. You can use it to recover files from different types of data storage devices. This software can run on all versions of Windows, including Windows 11, Windows 10, Windows 8.1/8, and Windows 7.
This Windows data recovery program has a free edition. To check if this software can find and recover your files, you can use this free edition to scan the target drive and see if the files you want to recover are included in the scan results.
PDR download
After downloading and installing this MiniTool data recovery software on your PC, you can use these steps to scan for drives and recover data:
Step 1: Open MiniTool Power Data Recovery Free Edition.
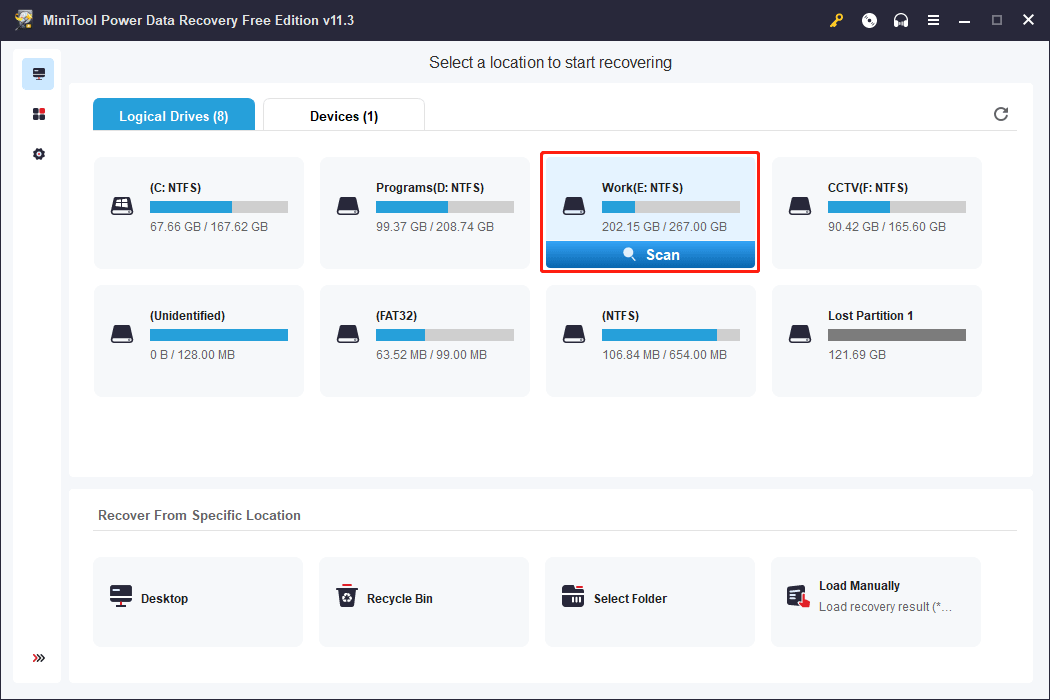
Step 2: Select the drive you want to recover from and click the Scan button to start scanning that drive. You can also switch to the Devices tab and select the whole disk to scan.
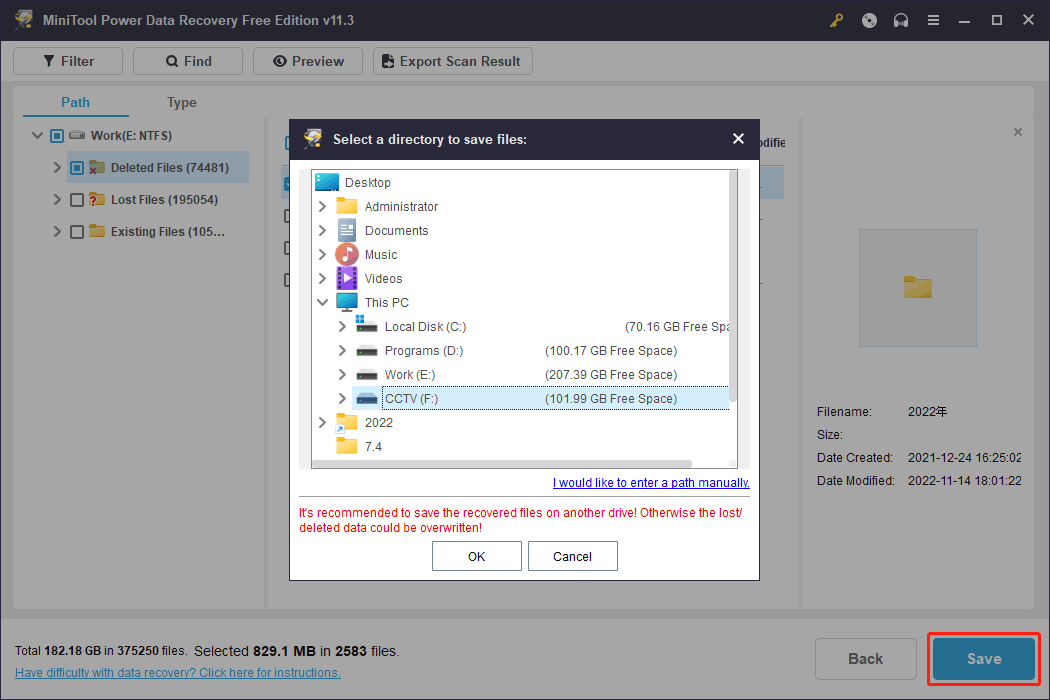
Step 3: After scanning, you will see the scan results. You can open each path to find your needed files. You can also switch to the Type tab and find your files by type. If you still remember the name of the file you want to recover, you can click the Find button, type the file’s name, and press Enter to directly locate that file.
Step 4: Choose your needed files and click the Save button to select a suitable location to save the selected files.
If you want to use this software to recover more files, you need to use a full edition.
Recover Data from Computer that Won’t Boot Normally
If your computer can’t boot normally, you need to use MiniTool Power Data Recovery bootable edition to rescue your files. Since your computer is unbootable now, you should save files to an external hard drive. So, you need to prepare an external hard drive that has enough space to store your files.
Step 1: Create a bootable medium using MiniTool Media Builder.
Step 2: Boot your computer from the bootable medium that is created by yourself.
Step 3: Enter the MiniTool data recovery software interface and select the target drive to scan.
Step 4: Select your needed files and save them to your connected external hard drive.
Wrap Things up
Want to force a Blue Screen of Death screen on your Windows 11 or Windows 10 computer? There are 3 ways and you can find them in this article. You can select a suitable method according to your situation.
Additionally, when you want to recover your lost and deleted files, you can try MiniTool Power Data Recovery.
Should you have other related issues, you can let us know in the comments. you can also contact us via [email protected].
About The Author

Position: Columnist
Stella has been working in MiniTool Software as an English Editor for more than 7 years. Her articles mainly cover the fields of data recovery including storage media data recovery and phone data recovery, YouTube videos download, partition management, and video conversions.